

Overview
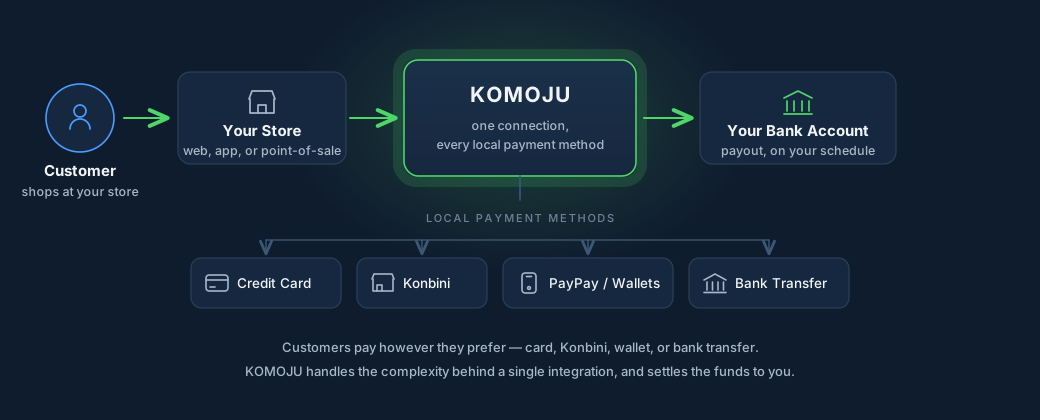
KOMOJU is a payment service provider (PSP) built for the Japanese market. Instead of integrating separately with each local payment method (such as credit cards, konbini, and digital wallets), you connect once to KOMOJU and access the full payment suite.
Why Teams Choose KOMOJU
Access to Japanese Payment Methods
KOMOJU provides access to payment methods that are essential for the Japanese market but difficult to integrate independently. This includes Japanese-specific methods like konbini (convenience store payments where customers pay cash at local stores) and Paidy (a popular buy-now-pay-later service in Japan), alongside globally accepted methods such as credit cards, PayPay, and Alipay. A single connection gives your application access to the full suite.
PCI DSS Compliance, Handled For You
KOMOJU handles PCI DSS (Payment Card Industry Data Security Standard) compliance on your behalf. PCI DSS is a set of security requirements for any system that stores, processes, or transmits payment card data. Without a service like KOMOJU, achieving and maintaining compliance requires costly security audits, infrastructure certifications, and ongoing monitoring. With KOMOJU's secure infrastructure, your team can process card payments without undergoing direct PCI DSS audits, which reduces implementation time and ongoing operational overhead.
While KOMOJU manages PCI DSS compliance for payment card data, you remain responsible for securing your own application and meeting any business-specific regulatory requirements.
One Integration Instead of Many
Maintaining separate integrations across multiple payment networks introduces recurring technical overhead and complex error handling. KOMOJU abstracts these differences behind a unified API and integration workflow, allowing your team to focus on core product features rather than individual payment processor requirements.
Built-in Management & Operational Tools
KOMOJU provides the dashboard and webhook systems needed to manage payment operations without building custom tooling. This streamlines transaction monitoring, refunds, and real-time payment event handling.
What Are You Trying to Do?
Select the scenario that matches your business model and technical requirements to find the appropriate integration guide:
I use an e-commerce platform (Shopify, WooCommerce, Wix, etc.)
- Integration path: E-Commerce Integrations (no-code)
- Install an official KOMOJU plugin to enable payment methods directly from your platform dashboard without writing custom code.
- Go to: E-Commerce Integrations Overview
I am building a custom website or checkout flow
- Integration path: Web Integrations or Payments API (low-code to custom)
- Choose the integration method based on the level of checkout control your application requires:
- Use KOMOJU Hosted Page to redirect customers to a payment page hosted by KOMOJU.
- Use KOMOJU Hosted Fields to embed secure payment inputs directly into your existing checkout form.
- Use the REST API to programmatically manage transaction authorization and payment creation.
- Go to: Web Integrations Overview · Payments API Overview
I run a marketplace or platform with sub-merchants
- Integration path: KOMOJU Platform Model
- Process payments on behalf of multiple sellers or vendors and automate payout splits under a single parent account.
- Go to: Platform Model Integration Guide
I operate a physical store or counter
- Integration path: KOMOJU Terminals (POS)
- Accept in-person credit card and digital wallet transactions using KOMOJU point-of-sale hardware.
- Go to: In-Person Terminal Setup
I have questions about account management, payouts, or billing
- Integration path: KOMOJU Help Center
- Access operational guides, billing details, and merchant account assistance through our customer support portal.
- Go to: KOMOJU Help Center
What's Included
Alongside integration options for web, mobile, and physical terminals, KOMOJU provides the tools needed to manage and monitor payment operations:
- Developer tools: APIs for custom integrations, webhooks for real-time payment event notifications, and a sandbox environment for testing with simulated payments.
- Management dashboard: A web interface for configuring payment settings, managing transactions (refunds, captures, and voids), and reviewing transaction reports.
- Payment infrastructure: Multi-currency support, settlement management, and compliance systems required for payment processing.
This documentation series explains technical concepts and terminology as they become relevant to your implementation.
How a Payment Actually Moves
KOMOJU sits between your application and the payment networks your customers use, handling protocol translation, routing, and status updates.
When a transaction occurs, the payment moves through these steps:
- Initiation: Your application sends a payment request to KOMOJU with the order details, including amount, currency, customer information, and the selected payment method.
- Routing and Translation: KOMOJU routes the request to the appropriate payment network, translating the transaction into the format and protocol that the network requires.
- Customer Authorization: Depending on the payment method, the customer completes authorization by verifying via 3D Secure, approving the charge in a mobile wallet app, or receiving a payment voucher for a convenience store.
- Network Processing: The payment network processes the transaction and returns the authorization result to KOMOJU.
- Standardized Response: KOMOJU normalizes the result and delivers it to your application through synchronous API responses and asynchronous webhook events.
This architecture decouples your application from the specific protocols, data formats, and processing rules of individual Japanese payment methods. You maintain one API integration and receive consistent response formats across all supported payment channels.
Next Steps
Choose the guide that matches your integration approach:
Add KOMOJU payments to Shopify or WooCommerce with official apps and plugins.
Explore E-Commerce IntegrationsChoose between Hosted Page and Hosted Fields for a custom website checkout.
Explore Web IntegrationsExplore endpoints, request and response schemas, and live examples in the API Explorer.
Explore the KOMOJU API ExplorerValidate your integration in Test Mode with test credentials and mock card numbers.
Get Test Credentials & Mock Card Numbers